Agarita berries are tart, sweet, and interesting to pick. Learn how to make simple, homemade pop-tarts using the Agarita berry jam – or whatever filling you like!
*Scroll to the bottom for the FREE PRINTABLE recipe!

Our family had a lot of fun picking these berries the last couple of weeks. We learned about them over the winter and have been patiently waiting for the berries to ripen enough to harvest.
We ended up picking a bunch of under ripe berries but we just couldn’t wait any longer! Foraging for berries is one of my favorite things to do!
If you wait until they’re all red, you’ll get a prettier color for your juice/jam/jelly.
**Stayed tuned for the upcoming video on my Youtube channel: Good Enough and Stuff.

***There are a lot of berry bushes out there that are not safe to eat so it’s important to be sure you identify a berry correctly. If you can, find a person who has eaten them before and have them point it out to you.
Watch the video!
What Do Agarita Berries Look like?
I like these berries a lot because they’re pretty EASY to identify.
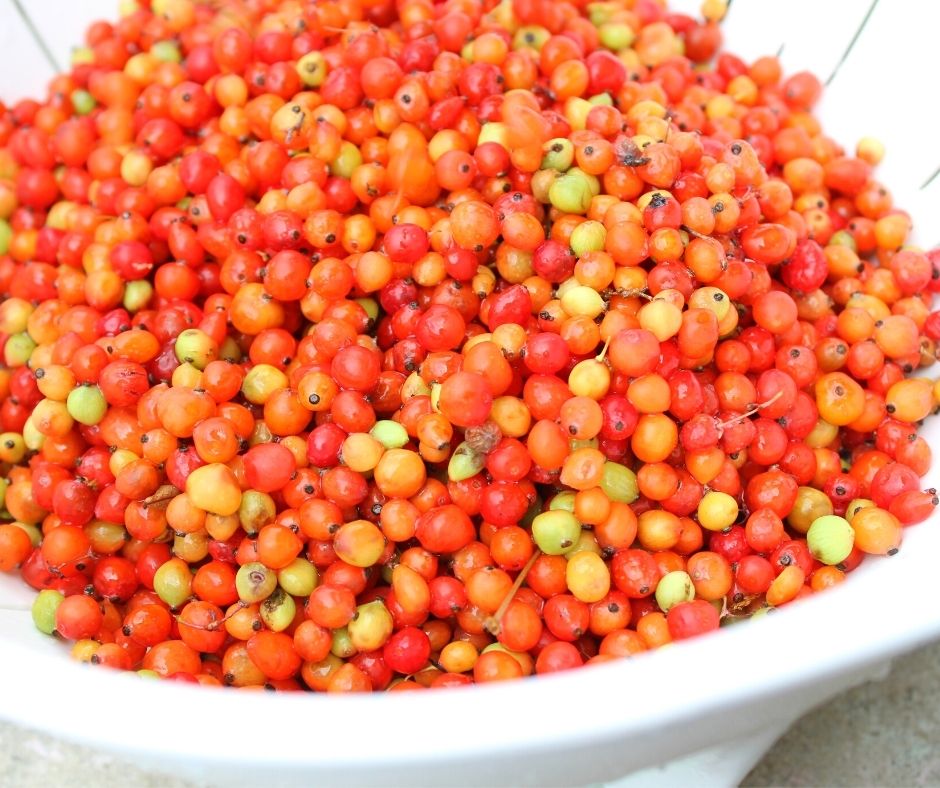
The berries are bright red and grow in clusters.
The leaves look a lot like holly leaves – stiff, grayish green, and spiky at the points.
The leaves also grow in groups of three, all stuck together at the center.


The berries start out as green then turn yellow, orange, and then red as they ripen. For the most part they’re round with a little black nub at the bottom, but we found some that had slightly elongated shapes.
They have several small seeds inside but they can still be eaten seeds and all. I prefer to strain the seeds out if I’m using a lot of them for cooking or baking.
Don’t worry about mistaking them for holly berries (which are poisonous) because holly berries show up in August, whereas Agarita berries are in season from April through June – sometimes as late as July.

The bushes have little yellow flowers anywhere from February to April. The flowers are supposed to be very fragrant and smell like honey.
The read berries grow all along the branches in clusters.

Are Agarita Berries Edible?
Yes they are! They can be eaten straight off of the bush or cooked and made into jam or jelly. It’s delicious!
They’re sometimes called the currant of Texas or wild currant.
What Do Agarita Berries Taste Like?
They are tart and sweet.
In my opinion, if you eat it right off the bush it tastes like a granny smith apple.
They also taste very similar to the red huckleberries we used to pick when I was a kid, up in Washington state.
Once it’s made into jam, it tastes like sour cherries or strawberries. So fresh and bright!
We mixed the jam with some fresh whipped cream and it tasted like the best, fresh strawberry whipped cream ever!

Where Can I Find Agarita Berries?
On the map, you can find them in Texas but you’re supposed to be able to spot them as far west at Arizona and down into Northern Mexico too.
They like to grow on rocky limestone ground in the sunlight but will also grow in shade. We often find them along trails, on the side of the road, and on the edge of the forest.
But they seem to be everywhere once you start noticing them.
How Do You Harvest Agarita Berries?
You can pick them one at a time but it’s really painful and takes FOREVER!!
The way I’ve heard most people do it is to lay a sheet down and beat the branches so the berries fall onto the sheet.
This is great if you have a lot of space but it’s awkward if you’re hanging out on the side of the road or on a hill.

We found that holding a large bowl under the branch and then smacking it works just as well.
Using tongs helps to grab the branches and position them so you can fit the bowl under.
Make sure to bring bags to put the berries in because the bowl gets heavy. It’s helpful to have a container to transfer them to so you can keep the bowl light.

There’s Gonna Be Bugs
Be prepared for the large amount of beetles and other critters you’ll knock into your bowl while harvesting.
We found A TON of small black beetles but they were easy to pick out of the berries. Sometimes they were all over a branch we wanted so Nathan just tapped it a few times to knock them off first.
We found several praying mantises in our bowl too and and even knocked a HUGE stick bug into it. That one freaked me out at first.


All the critters and leaves are easy enough to pull out by hand as you go along.
When you get home, fill the bowl with water so everything floats. Then just scoop out what you don’t want. Do this two or three times, especially if you have a large batch.

Pull out as much debris as you can but you can leave the small stems of the berries.

How To Make Agarita Jelly
Once you’ve extracted the juice you can make the jam or jelly.
This is the general idea if you want to cook and can it:
Cook 1 part Agarita juice with 1/2 part sugar. (So it could be 2 cups of juice to 1 cup of sugar)
Mix in low sugar pectin. You can follow the instructions on the box for how much you need.
Boil for a few minute then preserve it however you like; in the freezer, canning, or just eat it.
Too Many Seeds
My aim here was to make some sort of tart filling, not necessarily jelly because I didn’t really want to do any canning.
I tried cooking the berries a couple of ways since this was my first time using them.
The skin has a similar thickness to cherries so I thought that I might be able to treat them like cherries too.
So, I cooked the berries with sugar and a splash of vanilla. Then I added cornstarch to thicken the juice.
To my surprise it was delicious and unpleasant at the same time. The seeds are a no-go once the berries are cooked. There are just so many seeds and they’re woody and too big once they’re all concentrated like that.
I shoved the pie filling through a strainer and that solved the problem.
I took a different approach for the next batch.

How to Make Agarita Filling
This time I threw 8 cups of fresh berries into a blender with one cup of water.
Then, I strained it through a fine mesh sieve. This gave me the juice, plus some of the pulp and it had the texture of apple sauce.
If you JUST want the juice, squeeze it through cheese cloth.
8 cups of berries gave me just over 2 cups of pulpy juice.

Next, I cooked it over medium high heat with 1 1/4 cups of granulated sugar. I let it boil for about a minute then I added a cornstarch slurry of 2 tablespoons of cornstarch and 2 tablespoons of water.
Stirring constantly, I boiled that for about a minute until it thickened up and it was done!
This filling was delicious! Tangy, sweet, bright, fresh, and so good!!
It was perfect as a jam to spread on toast, put in a tart, or on some ice cream.

How to Make Homemade Pop-tarts with Agarita Filling
Preheat the oven to 400 degrees.
You’ll only need about 1 1/2 cups of the filling to make the pop-tarts.
You can throw the rest in the freezer or fridge.
For homemade pop-tarts, you need a batch of my Easy Pie Crust. Click HERE for that blog post and the printable recipe.
Tips for the crust:
This crust is flaky, delicious, and no fuss. There’s no ice cubes or fiddly stuff involved.
Just remember to use a pie cutter to cut the shortening in then use a big spoon to mix the milk mixture until it’s just barely coming together.
Turn the dough chunks out onto a floured surface and fold it and pat it into itself until it forms a cohesive ball.
You should be able to see a lot of shortening marbling the dough. This will give it the flaky crispiness.
Try to kneed the dough as little as possible so you can keep the layers and small ribbons of shortening.
Pop-tarts:
Now spread some more flour on your work surface, the top of the dough, and on the rolling pin.

Roll it out to an 8th of an inch and cut out 3×3 inch squares. I just used the length of my pointer finger as a rough guide and rolled it out in batches.
Squish the extra together as you go and roll it out too.
You should get about 24 squares but you really just need an even number so you can pair them up.
Don’t worry if they’re not perfect. I’m not good at rolling and cutting things evenly. These are homemade so they’re supposed to be rustic and uneven.
Embrace it!
Transfer half of your squares to a cookie sheet lined with parchment paper.
It’s ok if they tear as you pull them up. Just squish them back together into the shape you need and keep going.

Fill the squares on the pan with about 1-2 tablespoons of filling. Try and keep about a quarter of an inch away from the edge.
Cut 3 slits in the other 12 squares. It’s way easier to cut the slits before you put the tart together.
Now match up the squares.
If you have some squares that aren’t quite the same size, just pinch the edges of the top square to thin it out and widen it until it’s roughly the same size as the filled square. The slits also help the top square to stretch to fit.
Use a fork to crimp the edges together. Make sure to really push the fork through the bottom layer too. This seals the edges.
Mix 1 tablespoon of granulated sugar with 1/2 teaspoon of cinnamon.
Sprinkle each tart with a little cinnamon sugar and bake for about 18 minutes or until golden brown.

Finishing the Homemade Pop-tarts
Let these bad boys cool for at least 10 minutes because they are lava hot. It’s ok if the filling escaped during baking.
It’s just as delicious outside of the crust!

Whisk together 1 cup of icing sugar and about 2-3 tablespoons of milk. Drizzle this over the tarts and enjoy!
Store the tarts in an air tight container on the counter for 2-3 days. You can skip the fridge and throw them in the freezer for up to 9 months.
The filling cooked like this is really similar to the texture of commercial pop-tart filling. This is just really fresh and bright and the crust combined with the icing is like a mix between shortbread cookies and the best pie crust you ever had.
You can mix other fruit in with the Agarita filling if you want a hardier bite. I think it would go well with cherries, strawberries, blackberries or other types of berries.

We recently came across several white mulberry trees that are producing a TON of fruit but they’re very mild in flavor. Kind of like figs. I think those would be really good mixed in with Agarita berry filling!
I hope you get a chance to pick and cook some Agarita berries!
Don’t forget to pin it!

Print it for later!
Agarita Berry Filling

Agarita berries are tart and sweet! They make an excellent topping or filling.
Ingredients
- 8 cups Agarita berries
- 1 cup water
- 1 1/4 cup granulated sugar
- 2 tablespoons cornstarch
- 2 tablespoons water
Instructions
- Blend the Agarita berries with one cup of water.
- Mash and strain the berries through a fine sieve.
- In a saucepan over medium-high heat, bring the Agarita berry juice and the 1 1/4 cups of sugar to a boil.
- In a small bowl, whisk together the cornstarch and 2 tablespoons of water until there are no lumps.
- Stir in the cornstarch slurry into the Agarita berries and boil until thickened - about 1 minute.
- Enjoy!
Notes
If you want a clearer filling, use cheesecloth to strain the berries after blending them. You need at least 2 cups of juice for this recipe.
Nutrition Information:
Yield:
16Serving Size:
1Amount Per Serving: Calories: 97Total Fat: 0gSaturated Fat: 0gTrans Fat: 0gUnsaturated Fat: 0gCholesterol: 0mgSodium: 2mgCarbohydrates: 24gFiber: 3gSugar: 20gProtein: 1g
Homemade Pop-tarts

These Homemade Pop-tarts are filling, comforting and so delicious!
Ingredients
- 1 batch Easy Pie Crust
- small about of flour for rolling dough
- 1 1/2 cups pie filling or jam
- 1 tablespoon granulated sugar
- 1/2 teaspoon cinnamon
- 1 cup powdered sugar
- 2-3 tablespoons milk
Instructions
- Preheat the oven to 400 degrees.
- Line a sheet pan with parchment paper.
- Sprinkle your work surface and dough with flour and roll out the pie dough to 1/8 of an inch.
- Cut out 24 3x3 inch squares.
- Place 12 squares on the sheet pan.
- Cut 3 slits in the remaining 12 squares.
- Spoon on about 1 1/2 tablespoons of filling on the squares in the pan. Try to keep at least a 1/4 of an inch away from the edges.
- Place the squares with the slits over the squares with the filling.
- Use a fork to crimp the edges closed.
- In a small bowl, mix the sugar and cinnamon and sprinkle mixture on each tart.
- Bake for about 18 minutes or until golden brown.
- Let cool 10 minutes.
- Whisk the powdered sugar and milk then drizzle over each tart.
- Enjoy!
Notes
You can find my Easy Pie Crust and Agarita Berry Filling recipes on my blog: goodenoughandstuff.com
If the squares rip as you transfer them, just pinch the dough back together. The texture will be very flaky after it's baked so imperfections will not be as noticeable
If you're having trouble matching the tops to the bottom squares, pinch the edges of the top square to widen it until it fits.
Store your tarts in an air-tight container on the counter for 2-3 days or throw them in the freezer for up to 9 months.
Nutrition Information:
Yield:
12Serving Size:
1Amount Per Serving: Calories: 302Total Fat: 12gSaturated Fat: 4gTrans Fat: 0gUnsaturated Fat: 7gCholesterol: 0mgSodium: 198mgCarbohydrates: 46gFiber: 2gSugar: 16gProtein: 3g
Leave a Reply